
If you make a lot of Shrinky Dinks, you’re sure to have one curl at some point. It’s normal for the shrink plastic to curl in the oven. However, most Shrinky Dinks flatten on their own before they finish baking.
Why are your Shrinky Dinks curling? Shrinky Dinks curl when exposed to high heat. The plastic starts very thin, then thickens as they shrink. Thin plastic is much more likely to bend, so it’s not unusual for Shrinky Dinks to distort. However, they should flatten as they get thicker.
If you make a lot of Shrinky Dinks, you’ll want to learn more about why they curl. Most of the time, they fix themselves in the oven- but there may be occasions where you need to know how to flatten them back out. Let’s keep reading to learn more!
My Shrinky Dinks Curled, Now What?
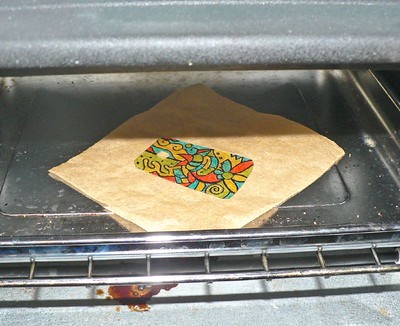
If you see your Shrinky Dinks curled in the oven, don’t panic! You can still quickly flatten them before they cool down. Remove your pan from the oven and place a piece of parchment paper over the curled plastic designs.
Next, use a spatula to press down on them. Hold the spatula there as the Shrinky Dink cools, holding its shape- this is all you need to do to undo the curl most of the time. However, suppose the Shrinky Dink has already cooled down. In that case, you’ll need to reheat them in the oven for two minutes before trying this method.
It’s easier to prevent them from curling than uncurl them. To do this, fold a piece of parchment in half and place the Shrinky Dinks as close as possible to the fold before putting them in the oven. You can also put an oven-safe wire rack over the parchment to add pressure to the shrink plastic.
Overall, if your Shrinky Dinks did curl in the oven, you can always make them lay flat again! If they’re cold, you’ll need to take a few minutes to heat them back up first.
How To Bake Shrinky Dinks
Most Shrinky Dink kits should come with instructions. You’ll want to follow those as the steps can vary slightly. In general, these are the steps that you should follow:
- Preheat the oven to 325°F (163°C). You can design your charms while it heats up.
- Cover a sheet or pan with foil or parchment.
- Place your Shrinky Dinks on the pan.
- Bake the Shrinky Dinks for 1-3 minutes; they usually curl during this stage.
- Give the Shrinky Dinks another 30 seconds to help them flatten.
- Remove and let them cool down before touching them.
Making Shrinky Dinks is very easy! The more you make, the easier it becomes too. Some kits recommend using different baking temperatures, so you’ll want to keep that in mind.

Lastly, you can leave large Shrinky Dinks in the oven for an additional minute or two since they’ll take longer than smaller designs to shrink and uncurl.
Why Aren’t My Shrinky Dinks Flat?

It’s normal for Shrinky Dinks to become wavy or curl in the oven. However, if yours always come out deformed, you might have the heat too high. Some ovens naturally run a little high, but shrink plastic can be very sensitive.
Try lowering the oven’s temperature by 25 degrees at a time. If they’re still not flat, you can lower the baking temperature.
Most of the time, you only need to put a piece of parchment paper over the Shrinky Dinks to stop this from happening. Curled Shrinky Dinks are usually a sign that they heated up too quickly. Removing them from the oven early doesn’t usually fix the issue.
On the other hand, you can leave them in the oven for 30 seconds after baking. Sometimes the Shrinky Dinks just need a few extra seconds to uncurl.
Why Aren’t My Shrinky Dinks Shrinking
When your plastic doesn’t shrink, that likely means that they weren’t in the oven for long enough. You’ll need to put them back in and wait for another two to three minutes since they need to reheat thoroughly after coming out of the oven.
Since everyone’s oven is different, the shrink plastic might not behave the same as it would for someone else. You may need to experiment with yours and see what temperatures and baking times work the best with your Shrinky Dinks.
Can You Reheat Shrinky Dinks?
You can easily reheat Shrinky Dinks! You may need to do this if they don’t uncurl or if they don’t shrink properly. Place the Shrinky Dinks back in the oven using the given settings, then allow them to heat up for about two minutes or so.
While the Shrinky Dinks are warm, you can reshape them. Reheating the Shrinky Dinks shouldn’t damage them, as long as you don’t make the oven too hot or leave them in for too long.
Overall, you can reheat your Shrinky Dinks as needed. You won’t want to do it too many times because you could damage them.
How To Seal Shrinky Dinks
There are a few different ways to seal your Shrinky Dinks and get great, long-lasting results. Many people choose Mod Podge- it’s widely available, provides a strong seal, and gives you a beautiful glossy finish.
To seal your Shrinky Dinks with Mod Podge, apply a small drop of the liquid first. Then, use a toothpick to pull the Mod Podge around the design.
If you want to seal the entire Shrinky Dink, you can also brush on a thin layer of Mod Podge. Give the seal time to dry, then apply another coat on the other side of the design. It can take Mod Podge 24 hours to cure (or longer, depending on the formula you use), so make sure not to touch it.

Final Thoughts
To summarize, Shrinky Dinks usually curl because they are very thin plastic. It bends when it heats too quickly, although most Shrinky Dinks should uncurl naturally in the oven. If they don’t, you’ll need to flatten them.
You’ll need to test how your oven handles Shrinky Dinks since everyones’ appliances are slightly different. You might discover that your design turns out the best when you remove them early, use a lower temperature, or change the baking process in other ways.
Make sure to follow all my tips and recommended products to ensure your Shrinky Dink project turns out great! Also, don’t forget to check out my other articles for all your painting Q&A’s. Happy painting!
