

You saw a really cute DIY Suncatcher online that you are excited to recreate, but you realize you’re not sure what kind of paint to use for it. There are many types of of paint out there, but acrylic are water based, so they will adhere to pretty much any surface.
When painting your Suncathcer, you want to make sure you have the proper type of paint that won’t chip off later on, or even change colors due to the sun. So, can you use acrylic paint on Suncatchers? Yes you can, but you might have to put in a little bit of work. Glass paint, sharpies, and even markers are sometimes a better choice.
In this article we go over everything you need to know to make really unique and long lasting Suncatchers. So let’s read on!
What is a Suncatcher?
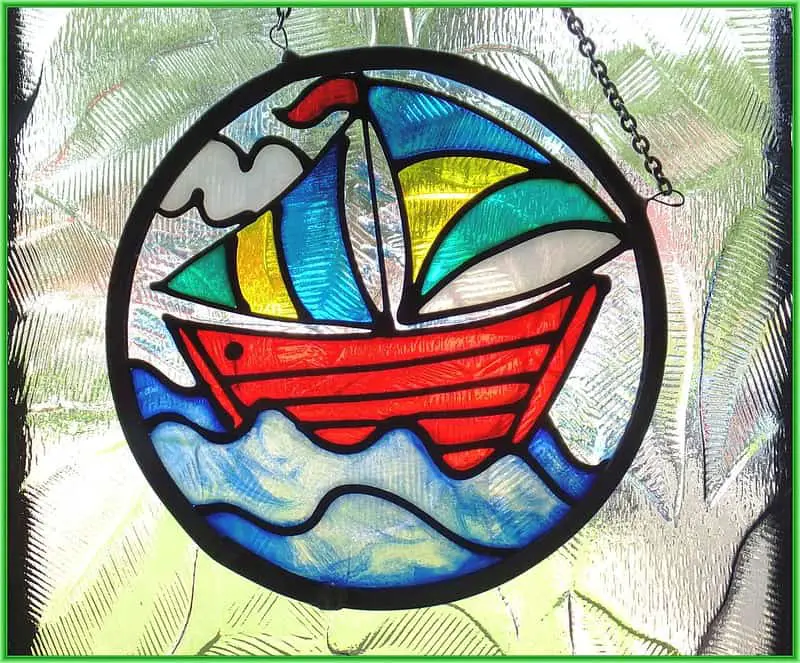
Suncatchers are small reflective ornaments that are hung inside near windows to catch the sunlight from outside. They are often referred to as the visual equivalent to windchimes. The artwork is supposed to help lift the mood of where it is placed.
If you’re looking for a cool suncatcher kit for kids, I recommend this set. It’s designed for children and even comes with paint!

Designs on suncatchers can be simple, or they can be abstract. In some cases, the designs might even include plants or animals. It is said that Suncatchers originate from Southwestern Native-Americans.
Suncatchers are most commonly used to bring Feng Shui and good energy into your home or place of work. They are said to take positive energy from the sun and spread energy through the area as the light shines through and emits the colors around the room.
If you’re looking for a glass Suncatcher kit, this Melissa & Doug Suncatcher Kit is my top pick. It’s a beautiful butterfly kit that is not only for kids, but also for adults.

Can You Use Sharpie on Suncatchers?

If you want to use a Sharpie marker on a suncatcher, it is possible. The ink in the Sharpie is translucent enough for the light to shine through like the regular paint used. Sharpies are also a great way for kids to experiment with suncatchers without getting paint everywhere.
For Sharpies, I recommend this Sharpie Color Burst Kit. It comes with 24 bright and colorful colors to choose from.

The best thing about using Sharpies on a suncatcher is the flexibility it has. If you make a mistake or use the wrong color, you can easily fix it. All you need to do is mix some vinegar and water while it is still wet, and it will come right off. If the Sharpie is dry, you can use some rubbing alcohol to fix the mistake.
Using a Sharpie instead of paint can give you more control over your coloring than using a paintbrush. This will make it easier to create a flawless design or carefully fill in a premade suncatcher.
How to Decorate Suncathers

There are so many ways that you can decorate your own suncatcher. First, if you are making your own suncatcher, you need the right material to work on. The best material to use is transparency film or an acetate sheet. You can draw your design on the sheet and cut it out before you color.
When it comes to the design, the options are endless. If you are decorating a suncatcher for Easter, you can design an Easter Egg. If it is Valentine’s Day, you can make a heart shaped suncatcher. You can try your hand at your favorite animal or a beautiful sunset.
Some of the most popular designs for suncatchers are patterns. You could make a circle pattern, a diamond pattern, or any other shape you would like. You are only limited by your own creativity and what you are willing to create.
If you search the internet, you might be able to find stencils that you can print out to make your designing even easier. Once you have your design picked out, draw it out on your transparency film or acetate sheet with a black Sharpie and let it dry.
My favorite and top pick is always Arteza Arteza Paints. They have so many different colors, and the quality is amazing! I usually use Arteza Paints for all my projects.

Once you have finished drawing your design and it has dried, you can start to color or paint. If you are using Sharpies to make your suncatcher, you can start as soon as you are ready. If you are using paints that are designed for suncatchers, set up your paints so they are all laid out in front of you ready to use.
When you have finished your design and have colored it in, you just need to wait for it to dry before you can hang it up.
How Long Do Suncatchers Take to Dry?
If you are using paint for your suncatcher, you can expect it to be dry to the touch in as little as 10 minutes. While it is dry to the touch, it will still feel a little tacky until it has completely finished drying. Depending on how much paint you used, the full drying process could take anywhere from one to three days before the paint is not tacky anymore.
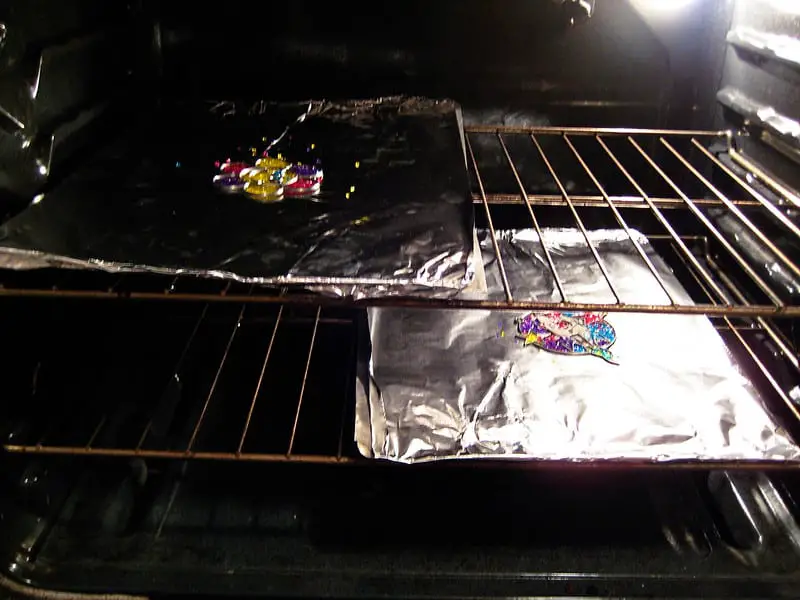
If you are using a Sharpie for your suncatcher, you will notice a drastically shorter dry time. It will only take the Sharpie about 20 minutes to reach full dryness. However, if you want to cure your suncatcher and have the Sharpie stick even better, you can bake it for an additional 20 minutes at 350 degrees. Baking is completely optional.
Final Thoughts
Suncatchers are adorable and make a great addition to any window. If you are wondering what the best paint to use for decorating a suncatcher is, acrylics can work, but shapers or glass paint are better. Paint used on suncatchers needs to be translucent, which you will not find in an heavy acrylic paint.
If you are in a pinch and really want to decorate a suncatcher but you don’t have any kind of paint available, you can use a Sharpie for the coloring. The ink in the Sharpie will give you the translucent look you are going for, while remaining a flexible material.
Dont forget to check out my other articles for all your painting Q&A’s. Happy painting!